Untuk menyambut datangnya hari raya idul adha, pastikan penampilan kamu pun terlihat tetap cantik, cerah, dan bersahaja. Salah satunya dengan menggunakan jilbab. Masih berpikiran menggunakan jilbab itu ribet dan susah?

Ikuti tutorial penggunaan jilbab yang praktis dan cantik berikut ini dari vemale.com. Kamu hanya memerlukan waktu satu menit saja untuk menciptakan gaya jilbab yang modis tanpa ribet.
Persiapkan terlebih dulu beberapa peralatan yang dibutukan, seperti berikut ini:
Ciput ninja
Ciput brokat
Beberapa jarum pentul
Peniti jilbab jika suka
Jilbab paris segi empat
Langkah 1:

Gunakan terlebih dulu ciput ninja dan lapisi dengan ciput brokat. Ambil jilbab paris, dan lipatlah hingga membentuk segitiga, dengan bagian kiri yang lebih panjang. Sematkan jarum pentul agar jilbab kencang. Kemudian biarkan bagian jilbab paris yang lebih pendek menuju pundak bagian kanan.
Langkah 2:

Selanjutnya biarkan bagian jilbab paris yang lebih panjang melebar hingga menutup bagian dada. Dan keluarkan bagian jilbab yang lebih pendeknya.
Langkah 3:

Setelah itu, angkat bagian ujung jilbab paris yang lebih panjang ke arah atas kepala kamu. Sematkan jarum pentul atau peniti jilbab dengan hiasan cantik yang kamu suka. Kemudian rapikan.
Hasil Akhir:

Dan seperti inilah nanti hasil dari kreasi jilbab cantik yang praktis. Cukup mudah, bukan? Gaya jilbab ini sangat cocok untuk penampilan kamu ke kantor, ke kampus, atau pun untuk bergaya dalam penampilan yang bersahaja sehari-hari.
Jangan lupa tambahan aksesoris cantik untuk jilbab kamu.
SELAMAT MENCOBA YA
HIJAB TUTHIJAB TuTORIAL BY KIVITZ :)

KIVUTZ Shawl Tutorial

yeepp.. it's easy and stylish
shawl material used is cotton shawl. So the fall is more inherent and convenient to use.. happy trying friends..
Hijab tutorial

Fold the scarf vertically to hide the tip of the scarf or to shorten the scarf.
Place your scarf about a third to the way down over your head.
Place your scarf about a third to the way down over your head.

Place the scarf all the way back of your head into your most comfortable position.

Tight your scarf on the back of your head as comfortable as possible.

Take the end of the scarf and round them around your neck.

Tucking in any remains ends under the front of the scarf and make it secure inside the hijab.

Take the bottom of your scarf from the back and pull it together to the front. Pin it.
You can pin the bottom side and the ear side of the scarf
to make sure your ear secured and covered.
to make sure your ear secured and covered.

TAAAAARRRRRAAAAA.....
Jangan lupa tambahan aksesoris cantik untuk jilbab kamu.
SELAMAT MENCOBA YA...
SALAM
- HIJAB TUTORIAL KREASI SAKINAH MODERN-
1st hijab tutorial
Accidentally folding around my hijab,, tadaaa..


then my friends said they liked it and asked me how to make it.


So here it is, my first hijab tutorial.. special for Anke.. *kiss*

1. Fold your hijab into triangle shaped (just a snatch part of it)
2. Put it over your head, one side longer than the other.
3. Place the longer side next to your face and the shorter one next to your ears.
4. Pin it at the top, to make it secure.

5. Hold your shorter part of hijab to your ears
6. Grab the back part of your hijab.
7. Pull it to the front.
8. Pin the back part of hijab and the shorter part of your hijab next to your ears.

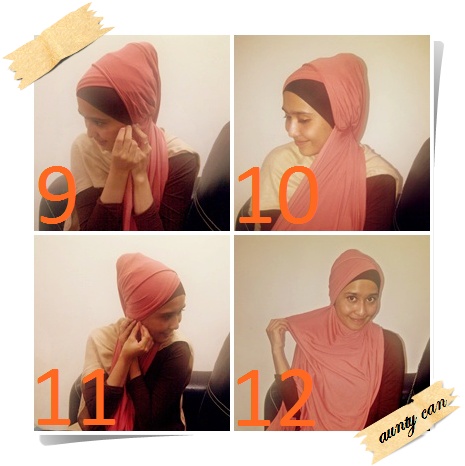
9. Pin the back part of your hijab at the back of your head to make it secure and neat.
10. Twist the shorter part of your hijab over to the other side covering your neck.
11. Pin it just right next to your ears.
12. Take a snatch part of the longer side of your hijab to add a drapery accent.

12. And pin it at the back to make it secure. Use brooch to make it nicer.
14. The look from the longer side of hijab (you can see the drapery accent).
15. The look from the shorter side of hijab (neat and simple)
16. Done :)
oya, this hijab style is inspired by Dian Pelangi and Hana Tajima..
hope you like it..
Love
2nd hijab tutorial
I got an idea to make this kind of hijab style on the day I'm about to go to RS Jakarta to control my braces last Thursday.

My dentist who has just 3 weeks wearing hijab (alhamdulilah) liked it then she asked me to share this hijab style before she pull,,, then put,,, then twist all the stuffs into my mouth :D I did starting to make that hijab style all over again from the beginning like these pictures im going to share,, ^_^

1. Put your shawl on your shoulder, one side is longer than the other
2. Fold a snatch part of the shorter one
3. And put it over your head crossway
4. Then pin it to make it secure and neat

5. Take the longer part of your shawl
6. And put it over your head crossway - reverse with the shorter part to make a triangle
accent
7. Take it to the back over your nape
8. Now the longer side of your shawl will be in the same position as the beginning

9. Take the longer side of your shawl next to your ears then pin it to make it secure
10. Then take it over to the other side covering your neck
11. And pin it next to your ears
12. Then take the longer side to the back
 13. And pin it at the back to make it secure and neat
14. Done
15. The look from the longer side of your shawl (you can see the triangle accent)
16. The look from the shorter side of your shawl
This style kinda look like turban style i think..
Hope you like it as my dentist does *wink*
good, no ? :$

My dentist who has just 3 weeks wearing hijab (alhamdulilah) liked it then she asked me to share this hijab style before she pull,,, then put,,, then twist all the stuffs into my mouth :D I did starting to make that hijab style all over again from the beginning like these pictures im going to share,, ^_^

1. Put your shawl on your shoulder, one side is longer than the other
2. Fold a snatch part of the shorter one
3. And put it over your head crossway
4. Then pin it to make it secure and neat

5. Take the longer part of your shawl
6. And put it over your head crossway - reverse with the shorter part to make a triangle
accent
7. Take it to the back over your nape
8. Now the longer side of your shawl will be in the same position as the beginning
9. Take the longer side of your shawl next to your ears then pin it to make it secure
10. Then take it over to the other side covering your neck
11. And pin it next to your ears
12. Then take the longer side to the back

14. Done
15. The look from the longer side of your shawl (you can see the triangle accent)
16. The look from the shorter side of your shawl
This style kinda look like turban style i think..
Hope you like it as my dentist does *wink*
Tidak ada komentar:
Posting Komentar