Ada banyak cara memakai jilbab, jika sebelumnya kita sudah mengenal Cara Unik Memakai Jilbab , maka kali ini saya akan berbagi bagaimana kita menghias jilbab kita dengan asesoris bunga, berikut caranya :
Bahan-bahan yang akan kita butuhkan :
-
Bahan kain Organdi, pilih warna yang nampak menarik, tidak begitu mencolok tapi tetap bagus dipakai menghadiri acara pesta.
-
Gunting kecil
-
Payet senada warna kain
-
Jarum
-
Benang yang juga senada warna kain

Langkah atau Cara Pembuatan:
-
Potong kain dari tengah, menyerong selebar 12 cm (bisa variasi sesuai keinginan), buat 2 potong. Simpan sisa yang berbentuk segitiga kecil, bentuk menjadi segitiga siku-siku sama sisi, dengan sisi kira-kira 60 cm. Lihat gambar yang diberi lingkaran pada gambar, hias kain dengan payet di bagian itu. Motif payet bisa beragam, bisa bentuk bunga, payet tabur, atau bentuk abstrak.
-
Langkah membuat bunga: Neci ujung-ujung kain termasuk yang segitiga (biasanya di tempat obras di pasar-pasar dengan harga Rp. 1.000 – Rp. 2.000 saja). Hasilnya akan bergelombang seperti pada gambar. Setelah itu, gulung lembaran panjang tadi, ikat di tengah-tengah. Kemudian atur kerutan pada ikatannya supaya bentuk bunga terlihat rapi. Dari dua helai kain tadi, akan terbentuk 4 bunga, satukan semuanya sehingga membentuk satu buket. Kencangkan ikatan benang di tengahnya, jahit kuat untuk menghindari bentuk bunga berubah-ubah. Tempel atau jahit peniti pada bagian belakang buket.

Cara Memakai Jilbab Dengan Hiasan Bunga:

-
Memakai jilbab seperti biasanya, tentukan warna senada dengan hiasa yang tadi sudah kita buat
-
Bentuk segitiga memanjang dengan bagian yang berpayet sebagai fokusnya.
-
Ikatkan pada kepala dengan simpul berada di samping kepala

-
Rapikanlah sisa kain yang masih berada di samping kepala
-
Saatnya memasang Bunga pada simpul, jadi deh
 , selamat mencoba

HIJAB TUTORIAL BY MARIA ELENA


3rd hijab tutorial
Last Saturday I went to Masjid Sunda Kelapa attending recitation held by Hijab Sakinah started from 9.30 - 12.00 (Dzuhur time). I was with myfriends. There were many pretty and modest girls right there, huwaaww.. alhamdulillahh.. I love to see more and more girls wearing hijab now, and they're modest yet stylish.. *kiss*
---------------------------------------------------------------
When I were listening the recitation, there's a girl asked me to share hijab that I was wearing. So then before we had dzuhur time, I did share how to make the hijab style at the toilet in Mesjid Sunda Kelapa,, heheuu,, kinda shy actually, cause there're a lot of girls suspiciosly glanced at us at that time.. :$
Oya, this what I wore
 Then we're all had praying time. When me and Anke were just about to leave Masjid, there's a cute girl asked me how to wear my hijab.. aaaaaaaa.. unfortunately I was in a rush so I couldnt share to her how I make my hijab like I did before.. Her name is Imma, so I only gave her my contact number and promised her to make a tutorial..
So here it is my 3rd Hijab Tutorial special for Imma..
 1. Put your shawl over your head, one side is longer than the other
2. Place the shorter side next to your face and the longer side next to your ears
3. Take the longer side to the back
4. Then take it over your nape
 5. Now the longer one will be at the same side as the shorter one
6. Take the longer side next to your ears then pin it to make it secure and neat
7. Then take it over to the other side covering your neck
8. And take it next to your ears then pin it to make it secure and neat
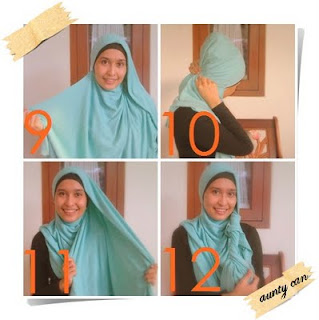 9. Take the longer side of your shawl to the back
10. Then pin it at the back to make it secure and neat (make sure your nape fully covered)
11. Now, take the shorter part, twist it
12. Then roll it
 13. Keep rolling the shorter part of you shawl, then pin it to make it secure and neat.
14. The look from the shorter part of your shawl
15. The look from the longer part of your shawl (you can add brooch to make it nicer)
16. Done
Oya, this hijab style is inspired by Suchi Utami. I did email her first when I was going to make this post, she's so kind.. :)
I hope you like it as Imma does,, ^_^
Don't be shy if you want to ask me, just drop your questions on the comment box below.. :)
Love
[Tutorial #8] Kriwil Perfect!
19OCT
Bahan kain Organdi, pilih warna yang nampak menarik, tidak begitu mencolok tapi tetap bagus dipakai menghadiri acara pesta.
Gunting kecil
Payet senada warna kain
Jarum
Benang yang juga senada warna kain

Langkah atau Cara Pembuatan:
- Potong kain dari tengah, menyerong selebar 12 cm (bisa variasi sesuai keinginan), buat 2 potong. Simpan sisa yang berbentuk segitiga kecil, bentuk menjadi segitiga siku-siku sama sisi, dengan sisi kira-kira 60 cm. Lihat gambar yang diberi lingkaran pada gambar, hias kain dengan payet di bagian itu. Motif payet bisa beragam, bisa bentuk bunga, payet tabur, atau bentuk abstrak.
- Langkah membuat bunga: Neci ujung-ujung kain termasuk yang segitiga (biasanya di tempat obras di pasar-pasar dengan harga Rp. 1.000 – Rp. 2.000 saja). Hasilnya akan bergelombang seperti pada gambar. Setelah itu, gulung lembaran panjang tadi, ikat di tengah-tengah. Kemudian atur kerutan pada ikatannya supaya bentuk bunga terlihat rapi. Dari dua helai kain tadi, akan terbentuk 4 bunga, satukan semuanya sehingga membentuk satu buket. Kencangkan ikatan benang di tengahnya, jahit kuat untuk menghindari bentuk bunga berubah-ubah. Tempel atau jahit peniti pada bagian belakang buket.Cara Memakai Jilbab Dengan Hiasan Bunga:
- Memakai jilbab seperti biasanya, tentukan warna senada dengan hiasa yang tadi sudah kita buat
- Bentuk segitiga memanjang dengan bagian yang berpayet sebagai fokusnya.
- Ikatkan pada kepala dengan simpul berada di samping kepala
- Rapikanlah sisa kain yang masih berada di samping kepala
- Saatnya memasang Bunga pada simpul, jadi deh , selamat mencoba
HIJAB TUTORIAL BY MARIA ELENA
3rd hijab tutorial
Last Saturday I went to Masjid Sunda Kelapa attending recitation held by Hijab Sakinah started from 9.30 - 12.00 (Dzuhur time). I was with myfriends. There were many pretty and modest girls right there, huwaaww.. alhamdulillahh.. I love to see more and more girls wearing hijab now, and they're modest yet stylish.. *kiss*
---------------------------------------------------------------When I were listening the recitation, there's a girl asked me to share hijab that I was wearing. So then before we had dzuhur time, I did share how to make the hijab style at the toilet in Mesjid Sunda Kelapa,, heheuu,, kinda shy actually, cause there're a lot of girls suspiciosly glanced at us at that time.. :$
Oya, this what I woreThen we're all had praying time. When me and Anke were just about to leave Masjid, there's a cute girl asked me how to wear my hijab.. aaaaaaaa.. unfortunately I was in a rush so I couldnt share to her how I make my hijab like I did before.. Her name is Imma, so I only gave her my contact number and promised her to make a tutorial..
So here it is my 3rd Hijab Tutorial special for Imma..
1. Put your shawl over your head, one side is longer than the other
2. Place the shorter side next to your face and the longer side next to your ears
3. Take the longer side to the back
4. Then take it over your nape
5. Now the longer one will be at the same side as the shorter one
6. Take the longer side next to your ears then pin it to make it secure and neat
7. Then take it over to the other side covering your neck
8. And take it next to your ears then pin it to make it secure and neat
9. Take the longer side of your shawl to the back
10. Then pin it at the back to make it secure and neat (make sure your nape fully covered)
11. Now, take the shorter part, twist it
12. Then roll it
13. Keep rolling the shorter part of you shawl, then pin it to make it secure and neat.
14. The look from the shorter part of your shawl
15. The look from the longer part of your shawl (you can add brooch to make it nicer)
16. Done
Oya, this hijab style is inspired by Suchi Utami. I did email her first when I was going to make this post, she's so kind.. :)
I hope you like it as Imma does,, ^_^
Don't be shy if you want to ask me, just drop your questions on the comment box below.. :)
Love
[Tutorial #8] Kriwil Perfect!
19OCT


Tidak ada komentar:
Posting Komentar